This card began its life as above. I used my photo program to erase the writing on the inside of the card on this one, but in some cases, I either left the writing as it was and cropped the sentiment inside, or I used a little whiteout.
This is the redesigned card. As you can see, I cropped the sentiment on the front of the card, inked the edges and layered it on red cardstock. I then added a bow. I fussy-cut the tree and stack of gifts, and further defined the image by adding highlights and shadowing with my colored pencils and white opaque pen. I then added lots of bling, popped the image up on pop-dots and added it to my card base.
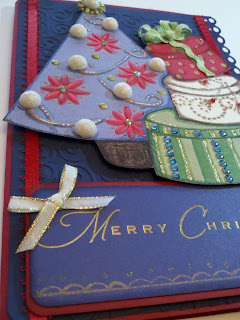
These are close-ups of the card showing the added details. You'll find little snowballs, gems in the centers of the poinsettias and along the lines of the gifts, as well as green rick-rack to define the bow on the uppermost gift.
The card base itself was done in dark red cardstock. The top, right-hand edge of the card front is trimmed shorter than the inside edge. I then cut a piece of dark blue cardstock to fit the card front, dry embossed it with my embossing folder, and then punched one edge with my scalloped edge punch. Red ribbon lines each edge. Before the cut image was added, the sentiment was inked, layered atop red cardstock, and attached to the lower half of the card base with foam tape. This ensures that the sentiment sits lower, underneath the tree and gifts.
For the inside of my card, I added a strip of gold hologram paper down the right-hand edge, making sure it showed through the scalloped edge of the card front above. After the sentiment was cropped, it was inked and mounted atop blue cardstock. The smaller image above was done similarly. I curled the edges of the sentiment slightly and attached it with pop-dots under the center of the sentiment and glue dots under each edge. Finally, I added a bit of bling to each edge and a bow to the image.
Hope you liked my recycled Christmas card. Perhaps this will inspire you to recycle some of your beautiful cards, as well! I have a few more to show you, too. I'll add those into a post tomorrow.
Thanks for joining me today and I hope to see you again soon!
Merilee
Recipe:
Recycled Card: Image Arts Greeting Cards
Cardstock: Blue and Red cardstock from my stash; Best Occasions-Prismatic Paper Pack
Ink: Tim Holtz Distress Ink-Fired Brick; Color Box Cat's Eye Fluid Chalk
Ribbon: 3/16" Red Ribbon-Offray; Martha Stewart Create-Piped Ribbon Bow Stickers; American Crafts-Premium Ribbon Rick-Rack
Embellishments: Michael's-Stud Embellishments and Rhinestone Stickers; Crystal Stickers-Glitter Domes; Recollections-Epoxy Stickers; Say It In Pearls-Embellishments by Prima
Adhesives: Recollections-Pop-Dots; Foam Tape-3M; Zots; Inkssentials-Glossy Accents by Ranger
Tools: Big Kick; Qu-cKutz Embossing Folder-Swirls; Fiskars-Scalloped Punch and Trimmer; Kimberly Watercolor Pencils by General's; Inkssentials-White Opaque Pen; Picassa 3 Photo Program; We R Memory Keepers-Crop-A-Dile Corner Chomper


No comments:
Post a Comment