Showing posts with label Cricut Imagine. Show all posts

Wednesday, February 8, 2012

Creative Critterz Imaginations Blog Post-Frogs


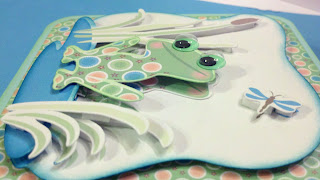
Hi everyone!  It's Merilee here with my take on this week's cute frog theme at the Creative Critterz Imaginations blog.  My grandson's birthday is coming up in March, so I thought I'd get a head start and create a card for him.  I decided to do an easel card so he could stand it up in his bedroom and look at it whenever he likes.
For this card, I used the Nursery Tails Art Cartridge.  I just loved the frog on this cartridge.  All of the patterned papers are from this cartridge, as well.  I printed and cut the backgrounds and then cut each layer out, as well.  Here are all of the cuts that I used:
Some of these images were extras and didn't make it on the final card, but I'll use them on the envelope, as well as for a gift tag.
The card base was made from two pieces of cardstock; the first cut at 4-3/4 by 9 and the second cut at 4-3/4 by 4-3/4.  Fold the longest piece in half to create a mountain fold and score the edges.  Then fold one of those sections in half again, this time creating a valley fold.  Adhere the 4-3/4 square to the folded section and you've got the base for the easel card.  If you'd like to view a Youtube tutorial for this card, it is available on the Splitcoast Stampers website here.  My card base dimensions are cut slightly different than the tutorial suggests.  You may choose dimensions to suit your needs.
The background is layered atop the patterned paper and is popped up with foam tape.  Then each subsequent layer is added over top with pop dots. 
The cute little frog is attached with an Action Wobble.  He wobbles back and forth as if he's going to hop right off the page!  I added green wiggle eyes for even more movement.
 
For the inside of the card, I cut the square with rounded corners using the basic shapes loaded on my Cricut Imagine.  I then flood-filled the square with one of the background prints from the Bonus Content on the cartridge.  
The trim along the bottom of this card is from the selection of Icons.  I chose the striped trim, flood-filled it with a solid blue and set the size at 2.0.  I then chose the same trim again, kept the striped pattern, but changed the size to 1.5.  It reminds me of rickrack.
Before layering these trims, I added the green print grosgrain ribbon from the Martha Stewart Create collection.  I couldn't believe how well it coordinated with the patterns on this cartridge!  Then the blue trim is adhered to the card with ScorTape, but the striped trim is popped up with foam tape in order to create the "stop" to catch the card front when it is open and create the easel effect.  I then added a blue button from my stash, threaded with two-tone twine from Stampin Up.  Just for fun, one more little frog is sitting above the button.  :o)
This was a fun and easy card to create with my Cricut Imagine.  Although the Nursery Tails cartridge is primarily for babies, so many of the darling images and elements can be used in other ways--this is only one of many examples.  I hope this inspires you to think outside the box and find other uses for your Nursery Tails cartridge.


Thank you for joining me today and I hope to see you again soon!


Merilee

Friday, January 6, 2012

Photo Frames using my Imagine

Hi Everyone!  I have a Cricut Imagine post today!

In order to commemorate the birth of my most recent granddaughter, I decided to make special photo frames using my Cricut Imagine for each of the baby's three older siblings.  Each big sister and brother would have a frame to hold their first photo taken with their very own new baby sister.


They were actually super easy to make with the Imagine!  Everything you see--all the patterned papers and the little characters, as well as the words, were all printed and cut with my Cricut Imagine using the Imagine More cartridge!  :o)


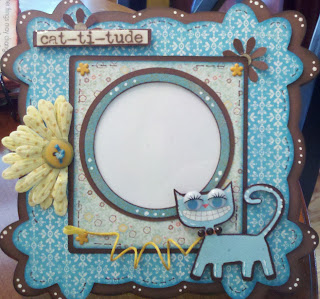
We'll start the breakdown with my oldest granddaughter's frame.  Missy loves the color blue, so I chose papers on my Imagine accordingly.  I cut the base for this frame using recycled cereal boxes for sturdiness.  I then applied the various layers of paper.  For the "glass", I recycled blister packaging that I saved from my Cricut cartridges.  I really love to use recycled materials when I create.


When creating things--especially for children--I always like to use lots of layering for more interaction.  As you can see, the kitty-cat has two layers which are popped up on foam tape for added dimension.  I created a collar using a bit of bling and a leash from curled yellow twine.  I also added wiggle eyes for a bit of fun.


Isn't this little kitty-cat darling?!?  Of course, you can tell she's a girlie-kitty since she's got gorgeous eye lashes, lol!  My granddaughters love, love love kitties!


A paper flower folded in half and inked looks darling when paired with a button!  I added some stitching along the edges of the frame and a few dots here and there to emphasize the curves.  The Cat-ti-tude banner is layered on top of brown cardstock and covered with Glossy Accents.  A few tiny flower brads in the corners and I was finished!  :o)

The second frame was created for my granddaughter, Sissy, and is almost exactly the same, using different colors and switching around a few of the details.


And there she is holding her new baby sister!  Those little flowers on the corners were made using a small flower punch.  The banners were all printed and cut using my Imagine.

On the front of this frame, the brown layer was applied to the cereal box using my Xyron machine.  But the subsequent layers were applied using foam tape.


The paper on the back of the frame was applied using ModPodge to make the entire frame a little sturdier.  The easel was made by simply cutting a strip of cereal box and applying brown cardstock to either side with ModPodge.  After allowing it to dry, I scored one edge and mitered the other.  I then punched holes and added eyelets to secure the easel to the frame back (with a dab of hot glue in the center for added security).


In this photo you can see the eyelet, as well as the little "apron" which secures the mid-section of the easel to the frame.  You can also see that I used ModPodge to completely cover the easel to give it a little more strength.  Didn't it turn out cute?


My grandson's card is slightly different.  I used a different background shape, but the basic structure and assembly process is exactly the same.  It may be a little hard to read, but it says "Paws-itively the best things".


You can see the layered effect in this photo, as well as the different elements that make up the frame.


As you can see, I used embossing folders to emboss the circles with paw prints, as well as to emboss the little puppy-dog's collar.  He, too, has a leash made from colored twine.  The "yippee" bone is the only sticker element I used that was not cut with my Imagine.  Everything else is on the Imagine More cartridge.


I used a little Glossy Accents on the paw prints above, as well as to the "paws-itively" letters below, to add some dimension. The little brads look like screws.


And the back of this frame is the same as the girls' frames.

I hope you enjoyed seeing my frames and come back to visit again soon!

Have a great day!

Merilee

Tuesday, June 21, 2011

Birthday Card

Hi Everyone!  Today I'm posting a birthday card I made for my daughter using my Cricut Imagine.  This was the first project I did using my new machine!  I just love it!  :o)


Using my Cricut Imagine and my Imagine More cartridge, I cut the card out using the layers feature and print/cut each layer out four times, and then twice using the cut only option with plain white cardstock. I chose different patterned papers for each layer.  For the card front, I cut away the leaves and ran the red layer of the flower through my Big Kick using the Regal Flourishes Sizzix embossing folder.  Then I embossed the leaves separately using my Herringbone Cuddlebug folder.  


I inked all of the edges of each layer using various colors from my Ranger/Tim Holtz Distress Inks and then began adhering the layers together over top of the plain white flower, front and back.  


On the inside I adhered the red layer and, since I planned to insert a gift card, I cut a small envelope with my Cricut, inked all the edges, and adhered it to the inside panel.


Before adhering the flower center to the inside panel, I stamped the sentiment using Clear Art Stamps by Crafty Secrets, Glamour Girls from the Heartwarming Vintage Collection.  


I decided to add the image of the girl (it reminded me of my daughter) by stamping it onto a piece of vellum and coloring it in with my regular Sharpie markers, shading from the back.  Then I cut the image out and adhered it with mini glue dots in opaque places of the image where the dots wouldn't show.  Isn't she the cutest?!?  :o)


To hinge the card together, I scored the edge of the card front only, secured it to the back using my ATG gun, and punched a hole.  I used a blingy brad from my stash which I pushed through two inked flowers and secured it to the card.


For the back of the card I simply inked the edges and then added my business stamp.  Later I covered the stems from the brad, but I forgot to take a photo of that--sorry!  :o}


I always dress up my business stamp to match the card and this time I added a little birdie I cut with my Martha Stewart punch.  Isn't it cute?  


Call me a perfectionist, but I can never send out a card in a plain white envelope, lol!  This one I cut from scratch using the darling polka dot cardstock from DCWV, Nana's Nursery stack.  I thought it coordinated just great and added that little bit extra to the ensemble.  I added my last flower layers to the front of the envelope using my Xyron machine--it glues things permanently so I don't have to worry about anything falling off once it goes through the post office.  The flower center was a simple circle cut from a Meade lined paper pad--it worked better for the address.  I hand wrote "Happy Birthday" all around the circle.


The back of the envelope had to be special, too!  I added another cut circle, a return address label, and adorned it with little flowers cut with my paper punch.  I then added a kitty-cat (my granddaughters are crazy about kitties, lol!) that I cut with the same cartridge.


That's it--the birthday card is complete and ready to be dropped in the mail.  I hope you enjoyed today's post!  


Have a great day!


Merilee


Recipe Ingredients:  Patterned Paper:  Imagine More Cartridge-Pgs. 38-39, 43-44
Cardstock:  DCWV-Nana's Nursery; Colobok-Textured Cardstock; Vellum-Staples; Lined Paper-Meade
Stamps:  Crafty Secrets Clear Art Stamps-Glamour Girls, Heartwarming Vintage Collection
Embellishments:  Blingy Brad-my stash; Flowers-my stash
Ink:  Ranger/Tim Holtz Distress Ink-Various Colors
Tools:  Cricut Imagine; Cricut Imagine Cartridge-Imagine More-Grateful Flower-Pg. 16, Kitty-Cat-Pg. 11, Envelope-Bonus Content-Pg. 29; Big Kick; Sizzix/Tim Holtz Embossing Folder-Regal Flourishes; Cuddlebug Embossing Folder-Herringbone; Bird Punch-Martha Stewart; Flower Punch-The Paper Studio; ATG gun; Xyron machine