Hi Everyone! I have a Cricut Imagine post today!
In order to commemorate the birth of my most recent granddaughter, I decided to make special photo frames using my Cricut Imagine for each of the baby's three older siblings. Each big sister and brother would have a frame to hold their first photo taken with their very own new baby sister.


They were actually super easy to make with the Imagine! Everything you see--all the patterned papers and the little characters, as well as the words, were all printed and cut with my Cricut Imagine using the Imagine More cartridge! :o)
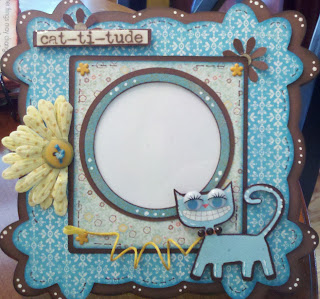
We'll start the breakdown with my oldest granddaughter's frame. Missy loves the color blue, so I chose papers on my Imagine accordingly. I cut the base for this frame using recycled cereal boxes for sturdiness. I then applied the various layers of paper. For the "glass", I recycled blister packaging that I saved from my Cricut cartridges. I really love to use recycled materials when I create.

When creating things--especially for children--I always like to use lots of layering for more interaction. As you can see, the kitty-cat has two layers which are popped up on foam tape for added dimension. I created a collar using a bit of bling and a leash from curled yellow twine. I also added wiggle eyes for a bit of fun.

Isn't this little kitty-cat darling?!? Of course, you can tell she's a girlie-kitty since she's got gorgeous eye lashes, lol! My granddaughters love, love love kitties!

A paper flower folded in half and inked looks darling when paired with a button! I added some stitching along the edges of the frame and a few dots here and there to emphasize the curves. The Cat-ti-tude banner is layered on top of brown cardstock and covered with Glossy Accents. A few tiny flower brads in the corners and I was finished! :o)
The second frame was created for my granddaughter, Sissy, and is almost exactly the same, using different colors and switching around a few of the details.

And there she is holding her new baby sister! Those little flowers on the corners were made using a small flower punch. The banners were all printed and cut using my Imagine.
 On the front of this frame, the brown layer was applied to the cereal box using my Xyron machine. But the subsequent layers were applied using foam tape.

The paper on the back of the frame was applied using ModPodge to make the entire frame a little sturdier. The easel was made by simply cutting a strip of cereal box and applying brown cardstock to either side with ModPodge. After allowing it to dry, I scored one edge and mitered the other. I then punched holes and added eyelets to secure the easel to the frame back (with a dab of hot glue in the center for added security).

In this photo you can see the eyelet, as well as the little "apron" which secures the mid-section of the easel to the frame. You can also see that I used ModPodge to completely cover the easel to give it a little more strength. Didn't it turn out cute?

My grandson's card is slightly different. I used a different background shape, but the basic structure and assembly process is exactly the same. It may be a little hard to read, but it says "Paws-itively the best things".

You can see the layered effect in this photo, as well as the different elements that make up the frame.

As you can see, I used embossing folders to emboss the circles with paw prints, as well as to emboss the little puppy-dog's collar. He, too, has a leash made from colored twine. The "yippee" bone is the only sticker element I used that was not cut with my Imagine. Everything else is on the Imagine More cartridge.

I used a little Glossy Accents on the paw prints above, as well as to the "paws-itively" letters below, to add some dimension. The little brads look like screws.


And the back of this frame is the same as the girls' frames.
I hope you enjoyed seeing my frames and come back to visit again soon!
Have a great day!
Merilee
In order to commemorate the birth of my most recent granddaughter, I decided to make special photo frames using my Cricut Imagine for each of the baby's three older siblings. Each big sister and brother would have a frame to hold their first photo taken with their very own new baby sister.


They were actually super easy to make with the Imagine! Everything you see--all the patterned papers and the little characters, as well as the words, were all printed and cut with my Cricut Imagine using the Imagine More cartridge! :o)

We'll start the breakdown with my oldest granddaughter's frame. Missy loves the color blue, so I chose papers on my Imagine accordingly. I cut the base for this frame using recycled cereal boxes for sturdiness. I then applied the various layers of paper. For the "glass", I recycled blister packaging that I saved from my Cricut cartridges. I really love to use recycled materials when I create.

When creating things--especially for children--I always like to use lots of layering for more interaction. As you can see, the kitty-cat has two layers which are popped up on foam tape for added dimension. I created a collar using a bit of bling and a leash from curled yellow twine. I also added wiggle eyes for a bit of fun.

Isn't this little kitty-cat darling?!? Of course, you can tell she's a girlie-kitty since she's got gorgeous eye lashes, lol! My granddaughters love, love love kitties!

A paper flower folded in half and inked looks darling when paired with a button! I added some stitching along the edges of the frame and a few dots here and there to emphasize the curves. The Cat-ti-tude banner is layered on top of brown cardstock and covered with Glossy Accents. A few tiny flower brads in the corners and I was finished! :o)
The second frame was created for my granddaughter, Sissy, and is almost exactly the same, using different colors and switching around a few of the details.

And there she is holding her new baby sister! Those little flowers on the corners were made using a small flower punch. The banners were all printed and cut using my Imagine.


The paper on the back of the frame was applied using ModPodge to make the entire frame a little sturdier. The easel was made by simply cutting a strip of cereal box and applying brown cardstock to either side with ModPodge. After allowing it to dry, I scored one edge and mitered the other. I then punched holes and added eyelets to secure the easel to the frame back (with a dab of hot glue in the center for added security).


My grandson's card is slightly different. I used a different background shape, but the basic structure and assembly process is exactly the same. It may be a little hard to read, but it says "Paws-itively the best things".

You can see the layered effect in this photo, as well as the different elements that make up the frame.

As you can see, I used embossing folders to emboss the circles with paw prints, as well as to emboss the little puppy-dog's collar. He, too, has a leash made from colored twine. The "yippee" bone is the only sticker element I used that was not cut with my Imagine. Everything else is on the Imagine More cartridge.

I used a little Glossy Accents on the paw prints above, as well as to the "paws-itively" letters below, to add some dimension. The little brads look like screws.


And the back of this frame is the same as the girls' frames.
I hope you enjoyed seeing my frames and come back to visit again soon!
Have a great day!
Merilee
Very cute and clever! Good luck with your DT submission!
ReplyDeleteSuch a lovely idea, not only the frames, but to give them as gifts to celebrate the arrival of a sister, they will be treasured for years to come I expect :)
ReplyDeletehttp://inmy-craftroom.blogspot.com/
Thanks, ladies! They really were fun to make and the kids loved them. That's what makes them all worthwhile!
ReplyDeleteMerilee
haha this are sooo cuuute !! the cat one gave me a little laugh because of those precious eyes! good luck ! :)
ReplyDeleteThank you so much. I thought those eyes were too cute. I just HAD to use them, lol!
ReplyDeleteI love the frames! Love that cat.. it looks like it has some cat-i-tude! :)
ReplyDeleteThank you so much! That's the look I was going for, lol!
ReplyDelete